- Southern Hemisphere Drift Alignment
- Quick Wedge Alignment
- Installing Bob's Knobs
- Collimating The Nextstar 11 GPS
- Cleaning The Azimuth Track
- GPS Battery Location
- Transporting the Nexstar 11 GPS
Southern Hemisphere Drift Alignment
If you do a search on the web, you will find plenty of examples of how to do a drift alignment in the Northern hemisphere. Here is the procedure I follow to perform a drift alignment in the Southern hemisphere. Only use the Alt and Az knobs on the wedge to make adjustments, do not use the hand controller during the drift alignment process. Ok, first you must determine which direction is East / West:
- Insert a cross hair eye piece and align the axis (cross hairs) of the eye piece and find a bright star.
- Turn off the scope's RA tracking motor.
- The star will drift. Rotate the eyepiece so the star is drift along one of the guide wires. The direction the star is drifting is WEST. The opposite side guide wire is EAST i.e. stars drift from east to west.
- Turn your RA tracking motor back on.
- Point the telescope at a bright star low (20 degrees)
on the eastern horizon. Centre the star in the cross hair.
Now watch for up / down drift of the star. Don't worry about
the star drifting left or right.
- If the star drifts NORTH (in the eyepiece, DOWN for SCT) its heading towards the North celestial pole, so your polar axis is too low. Turn your latitude (Alt) knob to raise your wedge plate higher. This will cause the star to move in the opposite direction.
- If the star drifts South (in the eyepiece UP for SCT) its heading towards the South celestial pole, so your polar axis is too high. Turn your latitude (Alt) knob to lower your wedge plate. This will cause the star to move in the opposite direction.
- Now point the scope at a bright star that is close to directly above your head (the Meridian on the celestial equator). Repeat steps 1 - 4 to determine the direction of WEST. Now watch for up / down drift of the star. Once again don't worry about the star drifting left or right.
- If the star drifts NORTH (in the eyepiece, DOWN for SCT) your polar axis is too far east, so use the Az knob to turn the wedge west (Right looking south).
- If the star drifts SOUTH (in the eyepiece, UP for SCT) your polar axis is too far west, so use the Az knob to turn the wedge east (Left looking south).
- After performing steps 3 and 4 you should repeat them again as one adjustment can throw the other one off.
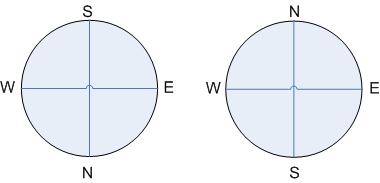
SCT / Refractor Reflector
Ok, so which way is North / South / Up / Down? This depends on how many mirrors you have in your scope and if you are using a diagonal. Odd numbers of mirrors (including the diagonal: 3 for SCT, 1 for refractor) use the left diagram. Even number of mirrors (reflector with no diagonal) use the right diagram. The EAST / WEST direction doesn't really matter if they are revered to the below diagrams (when looking through your scope), the NORTH / SOUTH direction will remain unchanged.
Quick Wedge Alignment
Here is the method I use to quickly align the N11GPS on its wedge.
- Power on the N11GPS
- Press menu select tracking then turn on EQ-South (or EQ-North) tracking.
- Optionally perform a drift alignment if you are using a tripod (I use a permanently alignment pier).
- Select two star alignment.
- Level the scope around the click sound of the down-stop.
- Perform a two star alignment.
- Go back into the menu and turn tracking back to EQ-South (or EQ-North) because at the end of the two star alignment the N11GPS would of set tracking to Alt-Az.
- Optionally set the lower filter limit to negative your latitude (e.g. -32). You only have to do this once. The controller will remember it from then on.
- Optionally do a 'view time site' and this will cause the N11GPS to do a GPS link and get the time location etc.
Installing Bob's Knobs
When I received my set of Bob's Knobs (They replace the philips collimation screws in the secondary), I asked my friend Robert Berta if he had any tips on installing the knobs. Here are Bob's instructions (reprinted with his permission):
First... Very important...when removing the knurled ring...or reinstalling it...use minimum pressure to avoid turning the bayonet mount itself on the corrector plate. I recommend using a bit of hand pressure with one hand to hold the secondary in place opposite that required to unscrew the knurled ring. When you replace it just get it snug...don't crank down on it. If you can't get the ring loose...or the secondary bayonet rotates on the corrector let me know...that is easy to fix yourself. Normally though you shouldn't have any problems. The best way to install the Bob's knobs is to VERY slightly loosen all the three existing screws...maybe a 1/16th turn or less. Just do NOT remove all three screws at the same time. While you can replace the screws with the secondary in place...I found it easier to do it after loosening the three screws by removing the secondary from the scope. Replace one screw at a time. I found that it helped to get started in the collimation process by visually leveling the mirror with the backing plate to get it in the ball park. Now replace the mirror in the bayonet. Of course you don't want to touch the mirror surface...don't even attempt to use a brush to brush off any dust. What you can't remove with a blower is best left in place. It won't make any difference...if you drag a clean brush across the mirror I can guarantee that there is some environmental film that will streak and that is far worse than the effect of dust. If you ever accidently do streak the mirror it is easy to clean it completely...but if you need to ....check with me first for the best way to do it. One other side point...with the Bob's knobs the Hyperstar plastic case that holds the mirror will be a bit tight. If found the extra height meant I had to cut the foam pressure pad in the storage box in half. To collimate...first stand at the front of the scope and look at the reflection of the various parts...ideally it should be pretty much concentric...if not go ahead and screw it up or down a bit to get it closer. With practice you can actually get pretty close this way. But the real colimation is done outside with a star.
Collimating The Nexstar 11 GPS
This is the second part of Bob's email. Bob's excellent description of the collimation process applies equally well whether you are using a screw driver with the standard screws or Bob's Knobs:
To do the colimation...aim the scope at a medium to bright star and center the star in the FOV. Do NOT use the diagonal for this step...it makes it hard to to since part of the image will be backwards and confusing. In addition you want to climate for the scope itself and not have that compromised by any inherent error in a diagonal. Instead put the eyepiece straight through....it helps to aim at a lower star of course to avoid a awkward position. Now focus the star and than put it a bit out of focus so you have a doughnut...white ring around a dark center. Generally I use around a 21-26mm eyepiece for this part. The focus knob should ALWAYS be finally moved in a counterclockwise direction to ensure that the mirror is settled and focuser is up against gravity (this is also why when actually using the scope the best focus should be achieved with the counterclockwise direction final movement). As you look at the out of focus star the idea is to have the black center perfectly centered in the doughnut. Most likely it will be off quite a bit if you are replacing the existing screws with Bob's knobs. To determine which screws need to be tightened/loosened you are going to look for the fattest part of the white doughnut. Lets pretend that when looking through the scope the fattest part is at 2:00. Place your hand on the outside of the scope at that point. Sometimes for a beginner it helps to have a piece of masking tape to mark this. Now go to the front of the scope and look for the location of the tape. From the front of the scope it will be at the 10:00 position. That side of the mirror needs to be tightened and the opposite side loosened. You don't want to just keep cranking down on a screw...instead slightly loosen the opposite screw or screws a bit first and than tighten the screw or screws that will effect the edge of the secondary closest to the tape marker. Depending on how far you are out...you may need to go a ways...but you will probably find that it is best to work in quarter turn steps at first. Later at the final tweaks you will just turn in very slight tweaks...maybe 1/16 turns or less. Once you have adjusted it a bit go back to the rear of the scope and RECENTER the bright star (it will move as the mirror moves). Again look for the fat part and see if it is improved. Note the area of the fattest part and again you want to mark the location with the masking tape marker. Generally as you make these mods you will be able to judge roughly how much the knob should be moved with each following step. Once you get it close be very critical...you may want to check the doughnut size on each side of focus to see which side is crispest to help in your efforts. Another thing you may note is that as you get closer the bullseye rings inside the white doughnut will start becoming obvious and finally sharper and sharper. Once you have it pretty good at this point and after the scope has cooled down a long time (hour or more) you can go to the next step. This is actually identical to the first step...only you use a higher power eyepiece. Depending on seeing you may or may not be able to get a clean image...but if you can get around 300x you can make extremely tiny mods to really refine the collimation. This usually is all you need to do BUT if you are really after the ultimate...go to as high of a power as you can muster with the seeing conditions and again center a medium bright star and get it as sharply focused as possible. This time you will look for the diffraction ring around the star. Ideally the star should be perfectly centered in the diffraction ring/rings. The diffraction rings are very faint and hard to see...especially with a large scope like a 11"...in fact it may be next to impossible to see them unless you have outstanding seeing conditions. But if you can get to this step you will have the absolutely best collimation possible and the resolution of the scope will be the best possible. Hope this helps...the main thing is don't worry...you can't really hurt anything...the secret is to always remember the secondary is sort of a 3D teetertotter...loosen one side....tighten the other side. Resist the urge to keep clamping tighter and tighter on one screw. Depending on where the screws are that might mean loosening 1 or 2 screws and tightening 1 or 2 screws. Once you have the collimation set you will find it will hold it VERY accurately without much attention other than a cursory tweak every once in a while. The Fastar design is a extra heavy duty secondary mechanism that seems to be a lot more stable than non Fastar secondaries. In short...removing the secondary won't itself change the collimation....but of course normal day to day use and knocks will gradually change it so you do need to check it occasionally. It only takes a few seconds to confirm if you are close or way out so I check every time I use the scope. You would be surprised at how many people are so afraid of this that they have NEVER collimated their scopes. When I do it for them and show them how...they can't believe the dramatic improvement in performance. Once you get this part figured out you may want to confirm the centering of the bayonet in your scope. While not important for visual...it will allow you to get the absolute best images with the Fastar/Hyperstar setup. I found the easiest way is to remove the secondary mirror and stand at the front of the scope. Close one eye and holding your head very steady and about 3' away look at the reflection of the various components. As you center your eye you should see everything concentric...if it is not than the corrector plate/secondary should be recentered. If you see this let me know and I can tell you how to do this...it is pretty easy and actually down the road you may need to do that if your secondary bayonet ever comes loose (not unheard of with SCTs). If one of the screws is burred...don't worry about it...just loosen the other two screws and it will take the "load" off that one so you can ease it out. Generally when a screw is burred it is because someone had the screw tighter than it needed to be. The Bob's knobs also can be tightened and after setting a while are a little harder to loosen...again...keep them on the just snug side. If one of them gets too tight you could grab it with a pair of pliers with a cloth around the knob so you don't mar it...I used this for a friends scope who had over tightened them. By the way...the one thing that will happen with the Bob's Knobs...is that the rotating cover won't be able to be snapped over the knobs as they stick out. I just left the cover in the open position...the little Fastar compatible sticker bugged me so I used a knife tip to pry it loose and than repositioned it square to the ground (I am anal about these little things). I think some people will just remove that rotating cover for better access to the knob's.
Cleaning The Azimuth Track
The N11GPS uses a 'racetrack' arrangement to move the scope in Azimuth. This consists of three roller bearing moving around on a metal track. Over a period of time material may accumulate on the track causing rough tracking. He is another of Bob's great tips on how to clean the track without unplugging any wires. I follow this procedure once a year.
....you don't need to unplug anything if you do the following. Remove the 5 allen screws. Gently lift the round cover up (the orange ring stays put...pull on the plastic edge above it). Lift at the side OPPOSITE the side that has all the plugs in it. The few wires are on the other side so you can tilt it up enough to get to it and clean the track. Hold the round cover so it doesn't fall off and pull the wires out. You should be able to raise it 3 - 4 inches. Use a paper towel or small cloth with alcohol on it and after releasing the RA clutch slowly rotate the fork so you can clean all of the track. While there also clean the faces of the three roller bearings. I have cleaned mine once over a year ago and decided to do it again tonight so I could make sure that what I tell Stephen was correct. After a lot of use...probably average of 3 nights a week...all I got was a trace amount of black soot dust...probably some of the worn off anodizing from the track. Mine was still nice and smooth although there is a bit of a surface to it..probably to grab the bearings cleanly. DO NOT grease this track. As a side note...there is one double wire and plug that goes to the slip ring on the other side and one larger multi pin plug to the board...you won't need to remove these.
GPS Battery Location
The lithium battery used by the GPS receiver in the N11GPS is located on the back of the small GPS board that is piggeybacked to the compass board located in the base. To see a picture click here. To get to the battery you would need to separate the two boards. This is the battery that saves the memory of the GPS downloaded time/date/satelite DB, etc. While once it is used it will update very quickly...when you use the scope for the very first time it takes longer...believe the GPS standard is for a total of 20 minutes to download the complete information it needs. While it may not seem that long to lock on and work...it is still downloading info in the background on the first use. That is why Celestron says that the first time you use it to let it run for an hour or so to ensure it downloaded all the DB it needed. If you go to a different location it will update the DB...if a very long way away...say opposite hemisphere...it will take a very long time to update. Celestron says up to an hour...but it can be cut shorter if you pull the battery and let it start from scratch. For me..it seems too much trouble to do that...just let it start running an hour before you need it ;-) Bob Berta
Transporting the Nexstar 11 GPS
The mirror in the N11GPS is quite heavy. To ensure that the weight of the mirror does no bend the rod it slides on you should always move the mirror to the back of the scope before transportation. This will ensure the mirror is snug. To do this turn the focus knob in a clockwise direction. It takes about forty turns to move the mirror from the front of the scope to the back.